Configuring Remote Access via SSH
SSH (Secure Shell) is a cryptographic network protocol used for secure communication with remote computers over unsecured networks. SSH provides reliable data encryption and a secure connection to a remote server.
With SSH, you can manage a remote system via the command line and securely transfer files between computers. It is one of the fundamental tools for system administrators and developers working with servers.
An SSH key in Windows, macOS, or Linux is one of the most secure methods for authenticating when connecting to a remote server. The main advantage of this method is that it is much harder to compromise than a traditional password.
To establish a secure SSH connection, two keys are generated:
- Public key — stored on the server in a specific directory (usually
~/.ssh/authorized_keys). It is a string of characters used to encrypt data when accessing the server. - Private key — stored securely on the client computer. It is used to decrypt data and confirm the user’s identity. For additional security, a password can be added during key generation.
For maximum security, it is recommended to disable password-based logins and allow only SSH key authentication. When connecting, the SSH client uses the private key to verify a match with the public key stored on the server. If the keys match, the login is successful, without requiring a password.
Using SSH keys provides a reliable and secure connection between the client and the server.
To enhance your server’s security, you should properly configure SSH access. Working directly as the root user is not recommended, as root has unrestricted access to the entire system, which increases the risk of mistakes, data loss, and vulnerabilities.
It is recommended to use sudo for administrative tasks and operate under a regular user account with administrator privileges. For security, SSH access for the root user should be disabled, and only your user account with sudo rights should be allowed to log in.
If needed, you can always access root privileges via sudo or by manually switching to the root user.
Connect to the server via SSH and update the package list:
sudo apt update && sudo apt upgradeAlways update the system before installing new software. After updating, reboot the server and log in using your user account.
If for some reason you don’t have a user account, switch to the superuser (root):
sudo -suCreate a new user with the following command (replace your_user with the desired username):
adduser your_userFollow the prompts to set the password and provide user information.
To grant administrative rights to the new user, add them to the sudo group.
Classic way using gpasswd:
gpasswd -a your_user sudoModern way using usermod:
usermod -aG sudo your_userBoth commands add the user to the sudo group and produce the same result. The difference is that gpasswd is a group management tool, while usermod is a user management tool. usermod -aG is considered the standard approach and is more commonly used in modern guides.
Switch to the new user:
su - your_userGenerating an SSH (Secure Shell) key pair is an important step to ensure secure and authenticated connections to a remote server. The keys are generated on your computer and used to verify your identity when connecting to the server.
To generate keys on Linux and macOS, open the terminal. On Windows, use PowerShell or WSL (Windows Subsystem for Linux).
Enter one of the following commands to generate an SSH key pair (replace [email protected] with your email address):
ssh-keygen -t ed25519 -C "[email protected]"Alternatively, generate keys without specifying an email:
ssh-keygen -t ed25519For greater compatibility with older systems, you may use RSA (less secure):
ssh-keygen -t rsa -b 4096After entering the command, you will be prompted to specify where to save the keys (by default, the ~/.ssh directory). Press Enter to accept the default, or specify a custom path.
Next, you can set a passphrase for added security. This passphrase will be required to use the private key. While optional, it is recommended.
After generation, two files will appear in your ~/.ssh directory: the public key (e.g., id_ed25519.pub or id_rsa.pub) and the private key (e.g., id_ed25519 or id_rsa). The public key can be given to a server administrator or copied to the remote server. The private key must be kept secure on your own computer and should never be shared.
You now have an SSH key pair ready for secure server connections.
For more information on generating and using SSH keys, see:
How-To Geek: How to Generate SSH Keys in Windows 10 and Windows 11
SSH Academy: ssh-keygen
Now you need to copy your public key id_rsa.pub to the virtual machine in order to enable secure SSH login. First, connect to your virtual machine via SSH:
ssh your_user@ipReplace your_user@ip with your username and the IP address of the virtual machine. For example:
ssh [email protected]Once logged in, you will be in your user’s home directory. To check the contents, use:
ls -laThere should be a .ssh directory. If it does not exist, create it with:
mkdir .sshA dot at the beginning of a directory name (e.g., .ssh) means the directory is hidden.
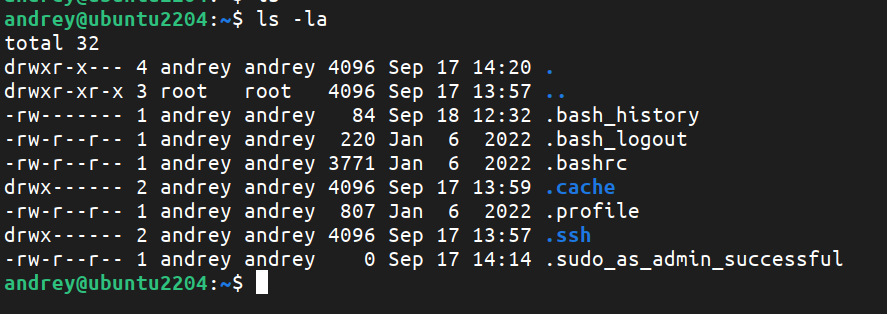
Set strict permissions on the .ssh directory to protect your keys:
chmod 700 .sshThis command restricts access to the directory to its owner only.
To enable SSH key authentication on your virtual machine, you need to create (or open, if it already exists) the authorized_keys file in your user’s .ssh directory. Use the nano text editor:
nano .ssh/authorized_keysNext, on your local computer, open the file with your public key. Run one of the following commands, depending on your operating system:
cat .ssh/id_rsa.pub— for Linux, macOS, and newer Windows versions with WSL.get-content .ssh/id_rsa.pub— for Windows 7/8 (without WSL).
Alternatively, you can open the id_rsa.pub file with any text editor and copy its contents.
Copy the content of your public key and paste it into the authorized_keys file on your virtual machine.
To save changes in nano, use Ctrl+O (write out), then press Enter to confirm. To exit the editor, press Ctrl+X.
Finally, set the correct permissions for the authorized_keys file:
chmod 644 .ssh/authorized_keysProper permissions are essential for SSH authentication to work correctly.
There is a convenient way to copy your public key to the server using the ssh-copy-id utility. This tool automatically copies your public SSH key to the ~/.ssh/authorized_keys file on the remote server.
Basic syntax:
ssh-copy-id -i ~/.ssh/your_key.pub your_user@your_serverIf you omit the -i option, ssh-copy-id will use the default public key (such as ~/.ssh/id_rsa.pub, id_ed25519.pub, id_ecdsa.pub, etc., if present).
How ssh-copy-id works:
- Searches for standard public keys in the
~/.ssh/directory. - Finds the first suitable
.pubfile (usuallyid_rsa.pub). - Copies its contents to the
~/.ssh/authorized_keysfile on the remote server (for the specified user).
After running ssh-copy-id, you can connect to the server via SSH without a password, using your key.
If you created a key with a custom name (for example, with ssh-keygen -f ~/.ssh/my_custom_key), specify it explicitly:
ssh-copy-id -i ~/.ssh/my_custom_key.pub user@serverSummary:
- By default,
~/.ssh/id_rsa.pubis used. - The key is copied to
~/.ssh/authorized_keyson the server. - If a different key is used, specify it explicitly with -i.
If you have installed your SSH public key in the authorized_keys file, you will be able to log in without a password. However, for complete security, you should fully disable password-based login. Here’s how to do it:
- Open the SSH configuration file:
sudo nano /etc/ssh/sshd_config - Change the SSH port:
Find thePortline and set a custom four-digit number greater than 1024, for example:Port 2222This helps reduce automated attacks on the standard port 22.
- Forbid root login:
Find thePermitRootLoginline and change it to:PermitRootLogin noThis increases security by disallowing direct root logins.
- Disable password authentication:
Find thePasswordAuthenticationline and set:PasswordAuthentication noAfter this, logins will only be possible using SSH keys.
- Save your changes and close the editor.
- Restart the SSH service for the changes to take effect:
sudo service ssh restartor simply reboot the server:
sudo reboot
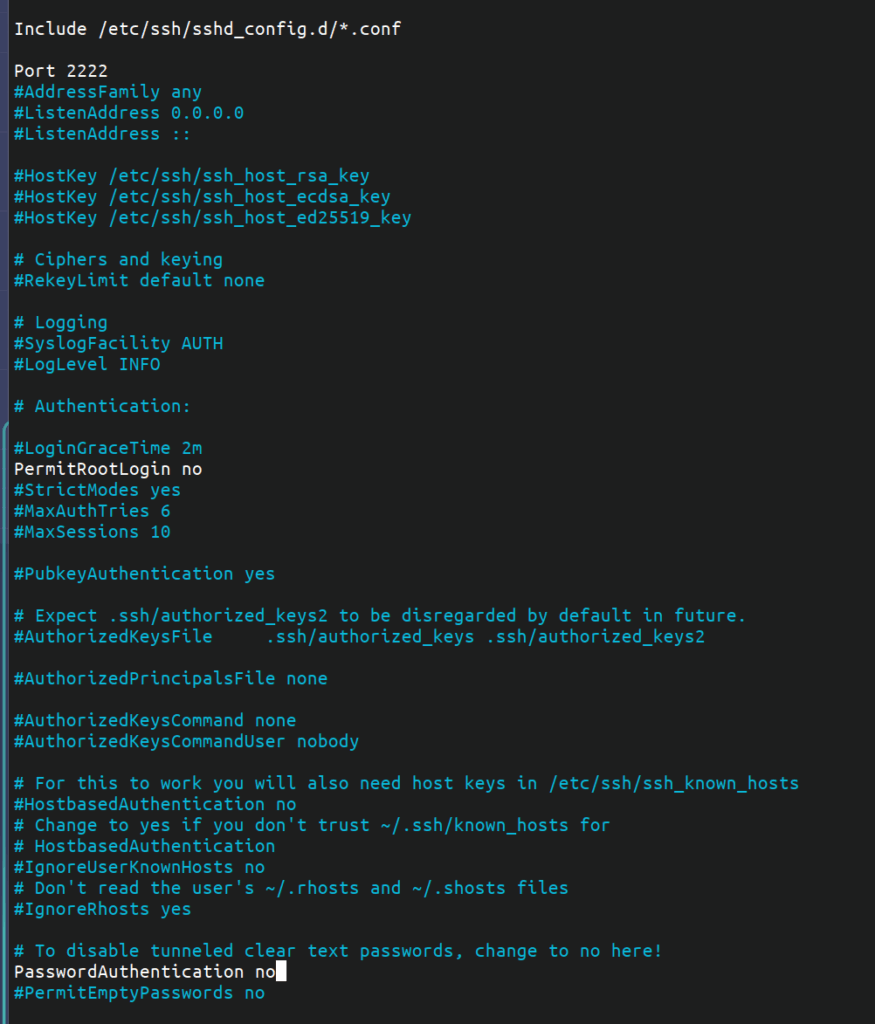
Important: Before disabling password authentication, make sure you can successfully log in with your SSH key and the new port. If there is any issue, you can always access the console via VirtualBox to fix the SSH configuration.
After changing your SSH configuration, connecting using the default port will no longer work:
ssh [email protected]
Now, you must specify the new port (for example, 2222) to connect:
ssh [email protected] -p 2222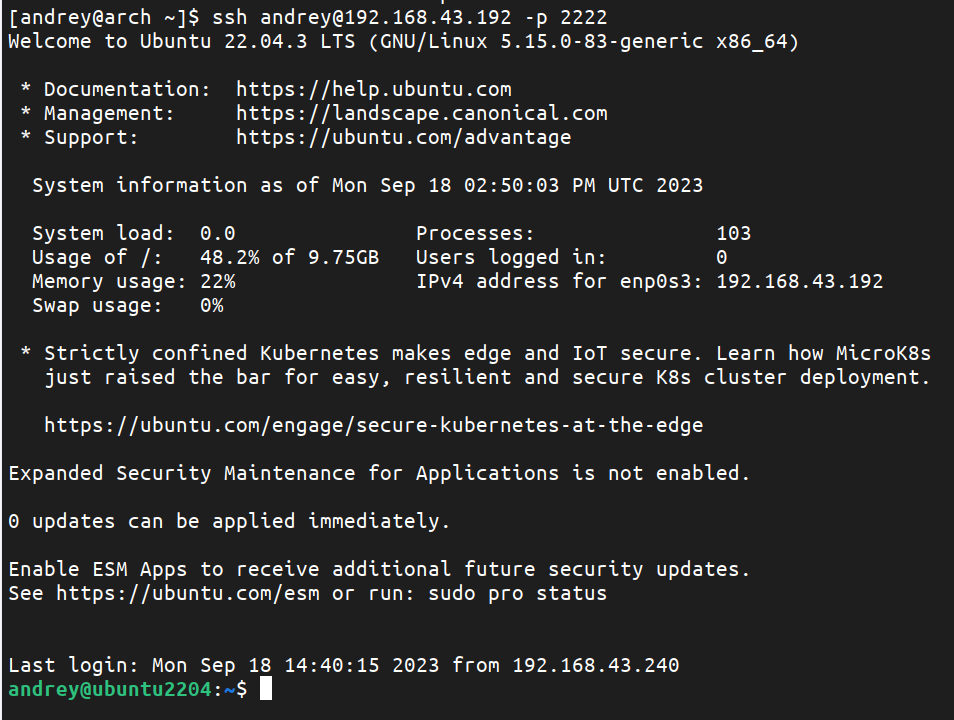
If you are able to connect via the new port, everything is set up correctly. Congratulations — your server is now much more secure!
If you have any further questions or need assistance, feel free to ask.
